
Vertical Bar Graphs in HTML. Part 1
by David Halls
Introduction
A previous article showed how horizontal bar graphs could be constructed in HTML using horizontal rules. Vertical bars are more difficult but can be constructed as images. The image can be a 1 pixel wide 1 pixel high coloured block which is stretched to the height and width for the bar. The height can be programmatically related to the value of the imported data, but before we get to that extra degree of complexity, the construction of a simple vertical bar graph will be demonstrated.
Basic Principles
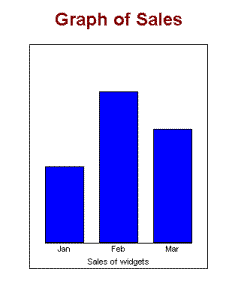
A table is used to form the layout for the graph, as shown in the HTML code below. For a 3-bar graph, 7 data cells are required, the 1st, 3rd, 5th and 7th providing spaces around the bars. Setting the bottom border of these cells to 1px solid black gives the horizontal axis under the bars. If a border is required round the graph, this can be arranged through a style statement in the table definition. The image (blue.gif), a square of blue 1px x 1px used to form the bars, is made in a graphics program such as Paint Shop Pro. You could have several of different colours. These images are stretched by the dimensions in the code to a constant width and a height dependent on the value of the data.
A second row in the table is used for the titles for the bars. A further row, spanning all the cells, is used for the title of the axis.
<table cellspacing="0" cellpadding="0" height = 300px bgcolor = "white" style = "border: 1px solid black;"> <tr> <td width = 20> </td> <td valign = bottom style = "border-bottom: 1px solid black;"><img src="blue.gif" width="50" height="100" border="1" ></td> <td style = "border-bottom: 1px solid black;" width = 20> </td> <td valign = bottom style = "border-bottom: 1px solid black;"><img src="blue.gif" width="50" height="200" border="1" ></td> <td style = "border-bottom: 1px solid black;" width = 20> </td> <td valign = bottom style = "border-bottom: 1px solid black;"><img src="blue.gif" width="50" height="150" border="1" ></td> <td width = 20> </td> </tr> <tr> <td> </td> <td>Jan</td> <td> </td> <td>Feb</td> <td> </td> <td>Mar</td> <td> </td> </tr> <tr> <td colspan = "7">Sales of widgets</td> </tr> </table>
This shows the basic idea and now we have to program the HTML code to take external data.
Reading the data
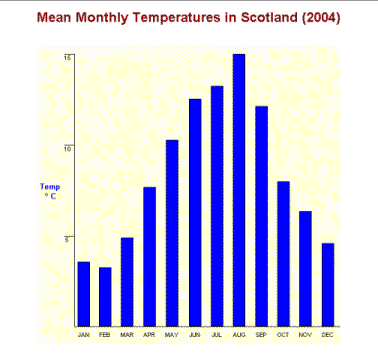
In a previous article, the FileSystemObject was used to read the two lines of data from an external file into an array. This can be used here. As we want to concentrate on the display in this article the arrays will be put directly into the script. The data are, as used previously, the average monthly temperatures in Scotland in 2004. At this stage we will establish some parameters needed in plotting the graph - the scaleheight for the y-axis, the number of bars to be plotted and the number of columns required in the table, which as explained above will be twice the number of bars + 1. This code goes in the <head> part of the page.
<script language="VBScript" type="text/vbscript">
<!--
dim monthdata, tempdata,numbars, numcols, colwidth, scaleheight

monthdata = array("JAN","FEB", "MAR", "APR", "MAY", "JUN", "JUL", "AUG", "SEP", "OCT", "NOV", "DEC")
tempdata = array (3.4, 3.1, 4.7, 7.4, 9.9, 12.1, 12.8, 14.5, 11.7, 7.7, 6.1, 4.4)

scaleheight = 15
numbars = Ubound(monthdata)+1
numcols = numbars*2 + 1
colwidth = 20
//-->
</script>
Setting up the table to form the graph
The code is shown below for the subroutine drawgraph. Firstly, the table is set up with a width calculated from the product of the number of rows (numcols) and the column width (colwidth). The first blank column is set up and defines the height of the row as 500px. Then a for...next routine iterates through the bars and subsequent spaces. The bar height is calculated from the mean temperature divided by the scaleheight multiplied by 500, the full height.
To draw the graph, the subroutine is called in a script section in the <body> section of the page.
Add to code in <head> section of page: sub drawgraph dim barheight 'set up table document.write "<table align = 'center' cellspacing = '0' cellpadding= '0' _ width='" & numcols*colwidth & "' border = '0' bgcolor = 'lightyellow'>" document.write "<tr>" ' first blank column document.write "<td valign = 'bottom' width = '500' style = 'border-bottom: 1px solid black;'> </td>" for i = 0 to numbars-1 ' scale bar height to value of mean temperature barheight = 500*tempdata(i)/scaleheight document.write "<td valign = 'bottom' style = 'border-bottom: 1px solid black;'>_ <img src = 'blue.gif' width='" & colwidth & "' height = '" & barheight & "'_ border = '1' ></td>" document.write "<td valign = 'bottom' style = 'border-bottom: 1px solid black;'> </td>" next document.write "</tr>" ' write column names in next row document.write "<tr>" document.write "<td> </td>" for i = 0 to numbars-1 document.write "<td>" & monthdata(i)& "</td>" document.write "<td> </td>" next document.write "</tr></table>" end sub The body of the HTML page should contain the following code: <body><center> <h1 align = "center">Mean Monthly Temperatures in Scotland (2004)</h1> <br /> <script language="VBScript" type="text/vbscript"> call drawgraph </script> </body>
So far, so good. We now have code to produce a vertical bar graph, but to improve it we need ways of indicating the scale of the bars. This will be dealt with in Part 2.