


BR Grain Wagons
This project was prompted by an article by Chris Nevard in the April 2013 issue of Model Rail[1]. In this, he described how to improve an 00 gauge Dapol Grain Wagon and repaint the private owner wagon as the original BR wagon. At about the same time, Hattons were offering unpainted N gauge Dapol Grain Wagons for £5 each. This seemed like an excellent opportunity to try out some of these ideas.
A further inspiration is the work of a group of EM gauge modellers portraying the 70s [2]. They have an article on their website describing their grain wagons. I am in awe of the work they do and I would like to aspire to their standards.
Lastly, for reference, there is Paul Bartlett's compilation of photographs of wagons[3], which shows that the grain wagons became very rusty in use. This has been very well portrayed by the EM gauge modellers.
The unpainted Dapol Wagon
The unpainted Dapol Bulk Grain Hopper (2F-036-000) is a well-detailed wagon and comes in a neat clear plastic presentation box. The only obvious way of taking it apart is a screw underneath in the hopper bottom. This, however, only holds the roof of the hopper on and, for the subsequent work, it is not necessary to remove it, unless, of course, you want to add weight.
Less obvious are tabs, one at each end, holding the body to the buffer beams. With a screwdriver or other thin blade, it is possible to separate the body from the chassis. Points to pay attention to:-
- There are girder ends and ladder ends which overlay the chassis. It is easy to bend these when trying to refit the body to the chassis. Fortunately, the plastic is soft and bent bits can be straightened again.
- It is very easy to lose the springs in the couplings in separating the chassis from the body. I lost one from each wagon!
After separating the chassis from the body, work can now go on to paint the two parts.
The underframe
This was painted with matt black enamel, followed by two washes of a brown earth-like colour (Wilco Nutmeg Spice acrylic testpot) to give it a rusty weathered appearance. The handwheels and brake lever ends were painted white.
The body

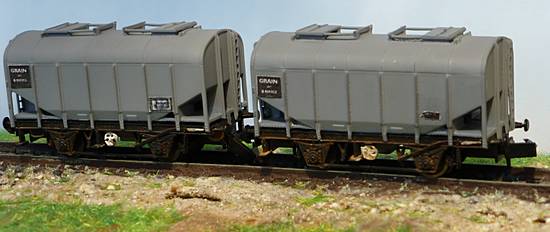
Following Chris Nevard's advice[1], I bought a can of Halfords grey primer to paint the body. I am not used to spraying such small items with a spray can and found it difficult to support the model without blowing it over. Spraying should be carried out with good ventilation because of the solvent fumes and smell. This normally means outside or in the garage. However, keep the spray can warm by keeping it in the house before going outside to spray.
As can be seen, the coverage is even and the colour is about right for a new Grain wagon. The body can now be refitted to the chassis taking care with the coupling springs and with the girder ends and ladder ends which go over the chassis.
The data panels
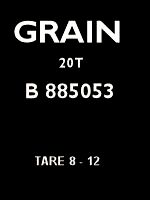
I have used printed data panels before for my coal wagons[4] and grey brake van. I print on ordinary (80 g m-2) paper, then cut to size and stick the panels onto the wagons. Chris Nevard did the same for his grain wagons in the Model Rail article[1].
Paul Bartlett's photographs[3] show that there are a variety of style and locations for data panels; consistency did not seem important in those days. I followed Chris Nevard's example[1] and produced the example above using Paint Shop Pro. The top half forms the left panel and the bottom half can be cut down to give the tiny "Tare 8-12" panel for the right-hand side. I found it better to use the fast setting on the printer as this uses less black ink and gives a clearer result on ordinary paper. My other grain wagon uses the same type of panel on the left but uses a different panel on the right, the same as I have used on some of my coal wagons[4]. All data panels were fixed with Johnsons Klear to the body.
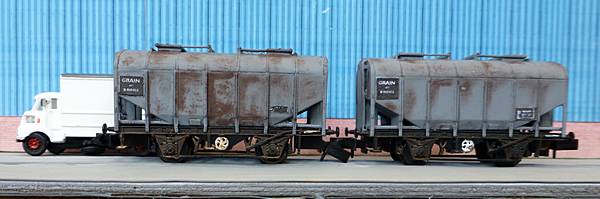
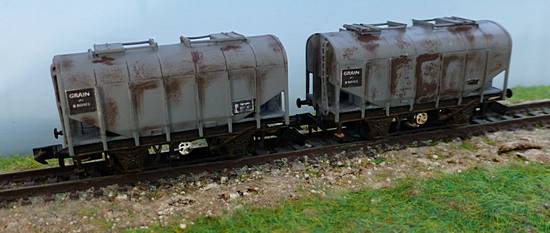
Rusting and weathering
The two wagons show different degrees of rusting and follow the examples seen in Paul Bartlett's photographs[3]. Rust was drybrushed on with Humbrol Track Colour.
When the "rust" had dried, the wagons were given a wash of dilute matt black to make them slightly dirty.
Conclusions
This was an interesting project and enabled realistic wagons to be produced from the low-cost Dapol unpainted Bulk Grain Hoppers.
References
- Chris Nevard, "How to Improve a Grain Wagon", Model Rail 180, April 2013.
- EM Gauge Grain Wagons. This website uses frames and the link takes you to the project page frame. This inspiring and useful website can be seen in its entirety through this link.
- Paul Bartlett's Photographs
- Coal train from Peco kits
Addendum: Handwheels or No Handwheels?
I bought another unpainted Dapol Grain Wagon and made it up in the same way but equipped it and the other two wagons with my own magnetic couplings.
However in looking at these wagons later, I found that most of the white handwheels were missing and I could not find any that had fallen off. I had only one handwheel left. I have long been pondering how I would replace the missing ones. Casting copies of the remaining one was one option. A second was to purchase etched handwheels.
However recently, I was looking at other images of model grain wagons (mainly on the Hattons website) and was surprised to find that the OO version of the Dapol grain wagon does not have hand wheels. Older Wagons (Hornby, Wrenn) also did not have handwheels.
I checked on Paul Bartlett's website and found that most examples of the prototype did have a handwheel but some did not. So it would appear that some of the wagons built had handwheels and some did not.
I have therefore decided to leave the wagons without handwheels. They still look good.
Article dated: 28/08/2013. Addendum added: 15/11/2022