


BRT Whisky Grain Wagons
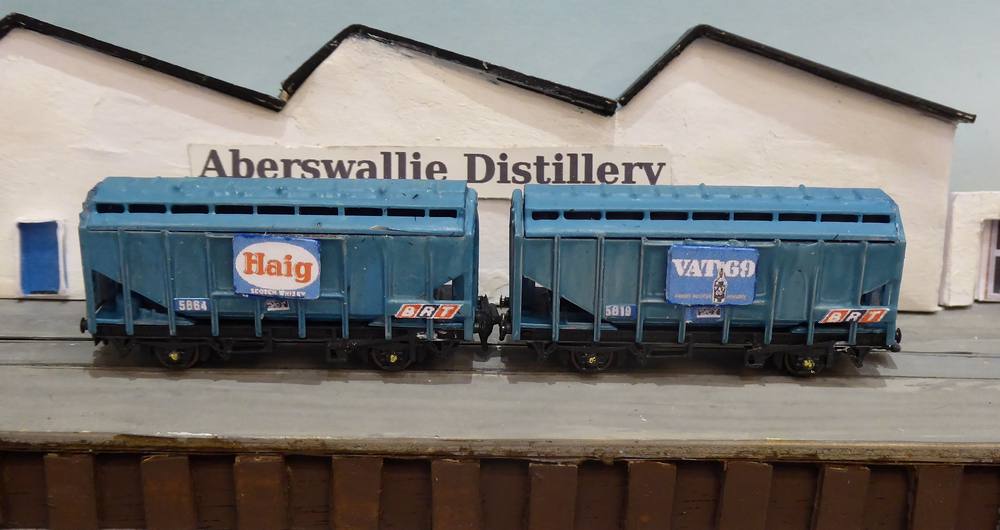
The prototype grain wagons, manufactured by BRT from 1965 onwards, were mainly used to carry barley from the south to Scotland for use in distilleries. Some carried posterboards advertising a brand of whisky. Ready-to-run models of these wagons have been available from Bachmann, Hornby and Trix in 00 gauge and Peco in N gauge. Peco offer a very attractive set of two whisky grain wagons [1]. The models available and the correct blue colour have been discussed on RM Web[2].
Photographs of these wagons in use seem to be rare. Paul Bartlett [3] shows his photographs of the BRT Covhop Grain wagons but none show the posterboards and many show their later conversion for carrying alumina. I found one reference on RM Web to a photograph of the wagons with posterboards at Knockando station [4] which is useful although I would hesitate to use it as a guide to the correct shade of blue, as it is a rather dark image.
I wanted to make my own models of these attractive wagons from the Peco KNR67 Grain Wagon Kit. I knew I would not be able to achieve as good a result as the ready-to-run version from Peco[1], but I find wagons that I have had a hand in building give me more satisfaction than a ready made version.
The Peco KNR67 Grain Wagon Kit
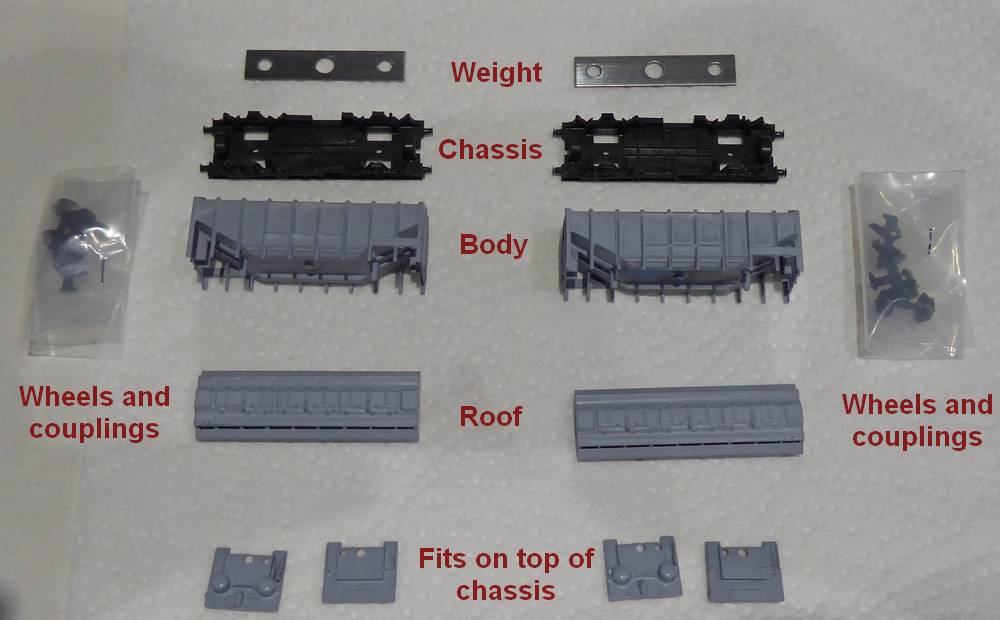
The two kits with the bodyparts sprayed with Wilco grey primer.
I bought two of these kits in 2021 from Hattons for £5 each and I think that is very good value.
I was impressed by the kit; it uses strong plastic with good moulding of the details. It uses the standard Peco 15ft wheelbase chassis. Instructions are supplied but they are generic and mainly cover the chassis, which is a shame as I took some time working out what two of the parts were for. The photo shows the constituent parts after the bodyparts had been sprayed with Wilco grey primer.
The mystery items are are two plates which fit on top of the chassis, one has vacuum cylinders.They are best painted first in the same colour as the body (blue). they then can be fitted at the ends of the body.
The underframe
The chassis was painted with Revell matt anthracite grey. A cocktail stick was used to put a little yellow paint on the roller bearing casings on the chassis. The ends of the brake levers were painted white.
I used Graham Farish metal wheels instead of the supplied plastic Peco wheels. The Peco Else couplings were adapted to magnetic couplings in a similar way to that I described for DMUs [5].
The metal weight was kept in place with a spot of superglue.
The body
The body had to be painted blue after it had been primed with grey primer. I made some wrong choices so I wish to share them with you.
Firstly, rather than order new paint, I used some gloss blue enamel that I had for ages. When it was dry, I coated it with Winsor and Newton artist's matt varnish to take away the gloss. The result was not bad although the paint layer was thick; however, I would have been better off buying a matt blue acrylic paint.
I painted the roof, body and two chassis cover plates separately. After painting the gloss blue and varnish, the roof would not fit and I had to scrape and sand to remove paint and varnish from the grooves. I suppose you could glue the roof on before painting but it is a tight fit, so painting it as one unit would probably glue it together anyway. Note that one end of the roof has a slot which engages with a ridge on the body.
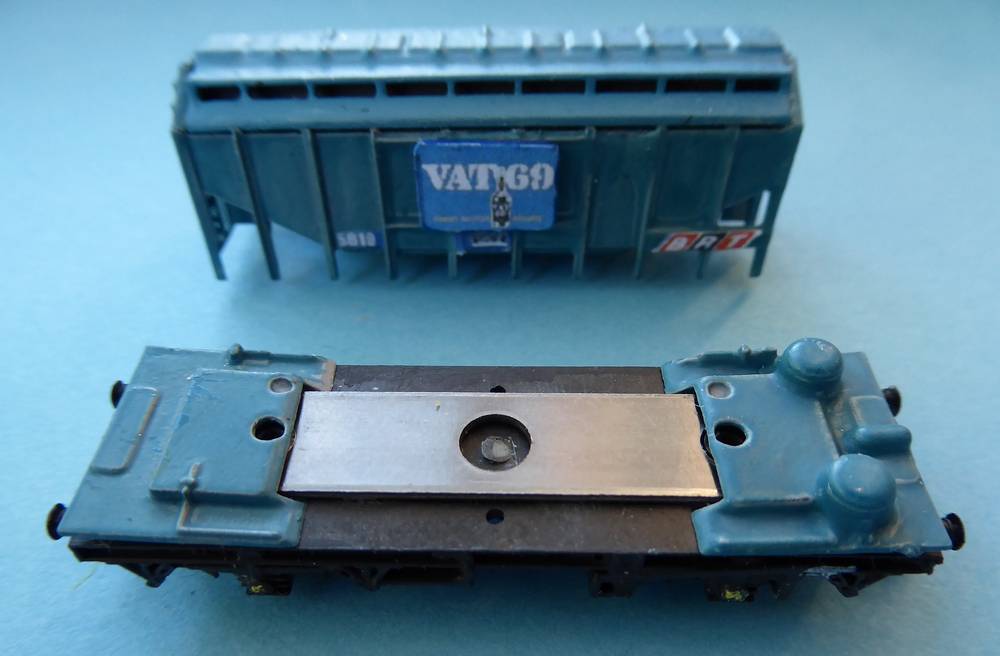
Fitting the two blue chassis cover plates
The two chassis cover plates do however need to be painted separately as it would be difficult with them fitted to the body. I found a good way to fit them together was to first position them on the chassis. Each has a hole that fits over the hole for the body locating pin.
The body can now be pushed down over the chassis. The two cover plates should click into position. If you wish to remove the body at this point, the two plates remain attached to the body. You are supposed to attach the body with nuts on the projecting pins. I can never get on with these and avoid using them. In this wagon, the body fitted tight on the chassis, so no extra fixing was necessary.
The decals
The body needs BRT logos, a data panel in the centre (underneath the poster board) and wagon numbers on the sides and ends. Commercial models also have other very small items on the body and chassis, but I kept it within my capability for working in N gauge.
Following my previous experience, I printed on ordinary (80 g m-2) paper, then cut them to size and stuck the panels onto the wagons. I confess I cheated with the design. I found suitable images of OO scale model grain wagons on the internet and resized them to the buffer to buffer length of my model. Multiple copies of the image were then printed on paper. From this I could cut out 4 numbers, 2 BRT logos and 2 data panels for each wagon. In the past, I have used Johnsons Klear to fix the panels in place, but it is a gloss varnish and leaves shiny areas behind which need disguising afterwards with weathering. This time, I used my Winsor and Newton artist's matt varnish which I know is very sticky. So far my experience in using this for fixing these paper decals is favourable.
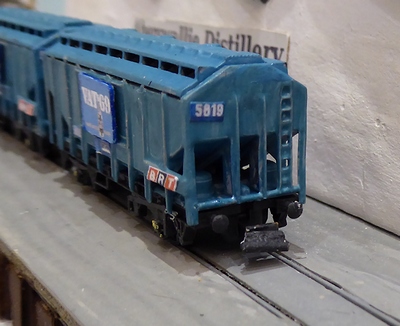
End view of BRT Whisky Grain Wagon showing location of number
The poster boards
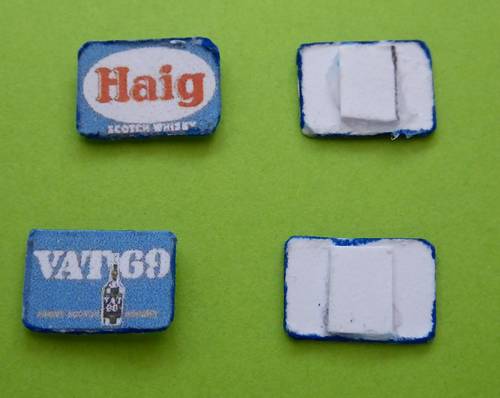
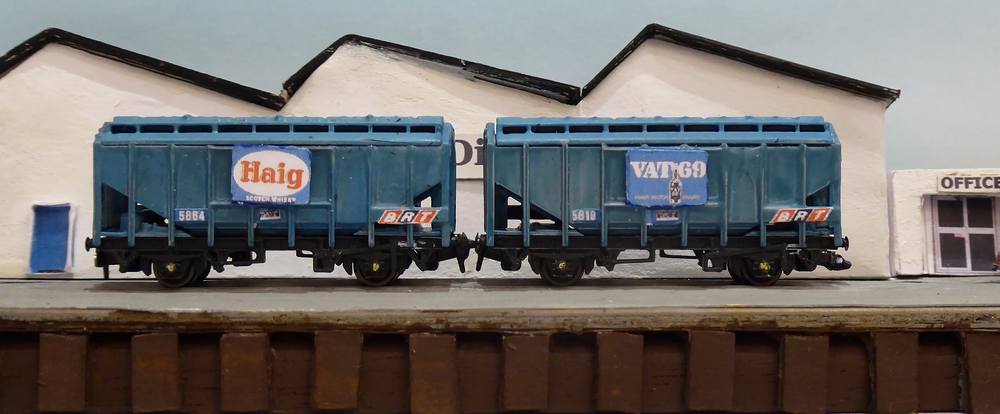
These are not part of the kit, but are simple to make. A Google search [6] shows a variety of whisky brands and differences in width of the poster boards. Some extend almost to the length of the wagon. I chose VAT 69 and Haig which have smaller boards and are the ones seen in the prototype photo [4].
From the images of the wagon sides that I had printed out on paper, I roughly cut out the poster boards and glued them to 1 mm thick card with a Pritt stick. TYhe poster boards were then cut to size and the corners rounded off with an emery stick. The white edges need colouring. I did mine rather badly with a blue paint pen.
The reinforcing girders on the side of the wagon and the two cross-girders form a central grid three blocks wide. The poster boards appear to be hung from the top cross-girder. The poster boards fit over the central block and can be held in place with a spacer of 1mm card cut to fit between the girders. The spacer is glued to the back of the poster board as shown in the photo above. The spacer may need adjustment to fit; when it is OK, the board can be glued into position with a blob of PVA glue.
Rusting and weathering
Paul Bartlett's photographs[3] of BRT Covhop wagons, most of which were photographed in their later roles, show no evidence of rust patches. There is grey dirt on the chassis and body. My chassis was painted with anthracite grey which is a step in that direction, but I may add more weathering to the chassis at a later date.
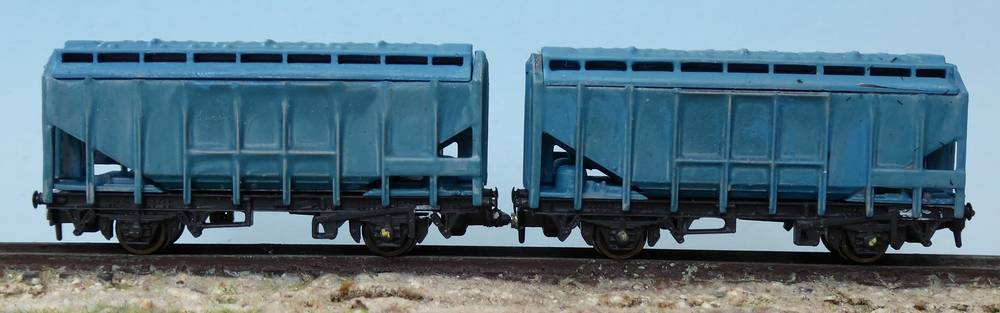
Somewhat unintentionally, I have achieved a faded blue appearance on the bodywork.
These Whisky grain wagons were essentially mobile advertising hoardings and I suspect they were kept cleaner than a normal wagon and certainly cleaner than when they later became used for transporting alumina.
Conclusions
I have previously made grain wagons from the Dapol unpainted Bulk Grain Hoppers [7]. These Peco whisky grain wagons are more colourful and I enjoyed making them.
What have I learnt?:-
- I should consider investing in matt acrylic paints rather than painting with gloss enamels and then toning it down with matt varnish.
- Matt acrylic varnish is a promising alternative to Johnson's Klear for fixing paper decals.
- Peco N gauge wagon kits have been around for a long time. They are well designed and produce wonderful wagons. I wish they would develop the range more. I know they have incorporated the Parkside Models range but the original range contains some great examples, like this grain wagon.
Addendum: A further whisky grain wagon
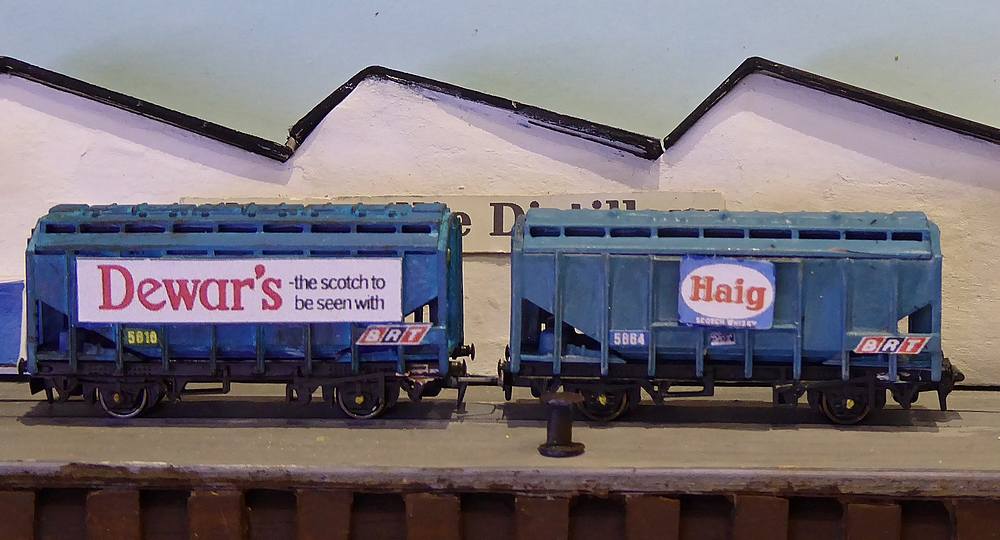
A new Dewars BRT Whisky Grain Wagon compared with one made in the previous batch.
I ordered another Peco kit to try to put into practice my observations for improvement from the construction of the previous batch.
The body and roof were to be pushed together and painted as one unit. The body and roof were already as one unit in the kit. However, I could not find the two chassis cover plates amongst the items in the kit and then discovered them in the body when I took the roof off. The roof was replaced and the combined unit sprayed with Hicote grey primer. I had run out of Wilco primer and so ordered Hicote grey primer from an ebay seller;I was quite pleased with the result.
The next objective was to paint directly with a matt blue paint. The paint I used before was Humbrol Gloss enamel 48 which is actually called Mediterranean Blue. Humbrol do not offer a matt version of that shade, so I ordered Revell Aquacote Matt Blue (56) but it was too dark a blue to match. I experimented by adding a bit of artists acrylic white to a portion with some water but that still seemed a long way away from the colour I used before. I thought I would try to mix a better shade of the Revell paint. I mixed a portion with water and two colours from my Artists Acrylic Colours ( Titanium White and Cerulean Blue}. It was better but needed toning down, so I did a little weathering with a burnt umber wash. The result is shown below.
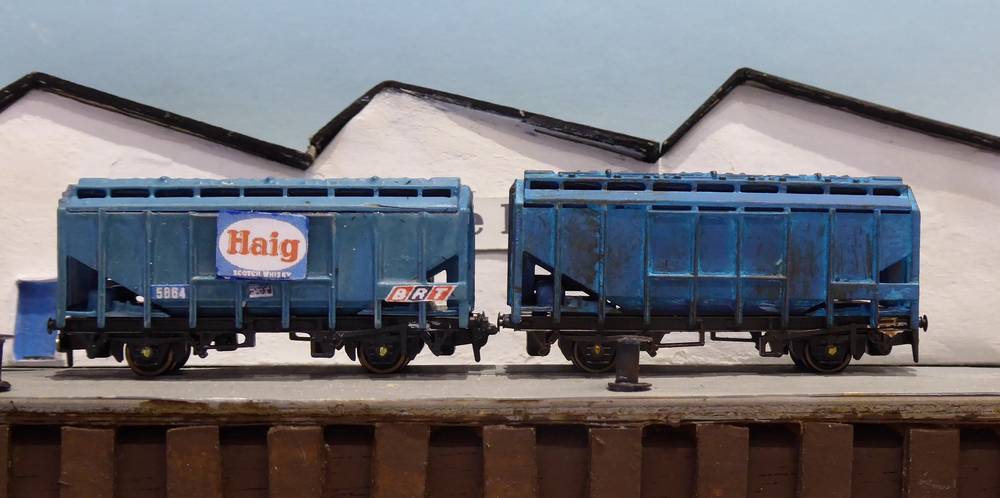
A comparison of the colour achieved on the new BRT Whisky Grain Wagon (right) after weathering compared with the colour of one made in the previous batch (left).
It is clear that the final colour is near but not close enough to the colour of the previous batch. I decided that, if I used a full width poster board, it would make the difference less obvious. I printed out on thin card some copies of a Dewars posterboard which is mainly white. I cut three pads 8 x 5 mm in card to support the poster board. These pads were glued in the 3rd, 5th and 8th partition along the side of the body to give support to the board at the two ends and centre. THe board was then glued to these pads.
The wagon fits together well. I glued the weight to the chassis with superglue but the rest of the body and chassis was just pushed together, without glueing.
I suppose the moral of this story is that it is not so easy to get matt versions of some colour shades.
References
- Peco set of two whisky grain wagons
- RMWeb Discussion on Whisky Grain Wagons
- Paul Bartlett's Photographs of BRT Grain Wagons
- Ernies Railway Archives - Photo of BRT Grain wagons at Knockando station
- Magnetic couplers for diesel multiple units in N gauge
- Google search of BRT whisky grain wagons
- BR Grain wagons (DJH Web)
Article dated: 14/07/2021 Amended: 02/11/2021 with third Whisky grain wagon